GH Apparel | GH Printing | GH Apparel | GH Packaging | GH Sports

Wednesday, November 26, 2014

From Concept to Creation: Dressing Up a Room with Vinyl Graphics

We've recently completed the project of decorating our creative room! Our company so generously bought us some very comfortable Xorbee bean bag chairs.


This was a great first step to creating a space that flourishes creativity but these fun chairs were in a room with empty walls – we needed to add something more. After a brainstorming session on the room, we decided we wanted to play off the natural wood that comes in the building and wanted to make it feel like our own indoor tree fort. So we went to the drawing board and came up with some concepts.

Option A

Option B

Option C
We took a vote through our company and customers and the winner was option A. Our fist step was to take measurements of all the walls and carefully map out our plan. Then we started designing each wall with the idea to bring the outside in. Once the walls were designed we sent the files to be printed. 

From there the fun started: Installation – Bringing the idea to life! 
Each wall is applied with custom printed adhesive vinyl that doesn't affect the paint on the wall underneath. Interested in creating your own fun room? The possibilities are endless! Learn more here.


Voila! The development of a custom Tree Fort room made possible with adhesive vinyl decals from GH Imaging. To start collaborating about ideas or to order your own, click here!

Wednesday, November 5, 2014

Designing Custom Calendars is Easy as 1..2..3..

Designing a standard 12 month (saddle stitched) calendar in InDesign:


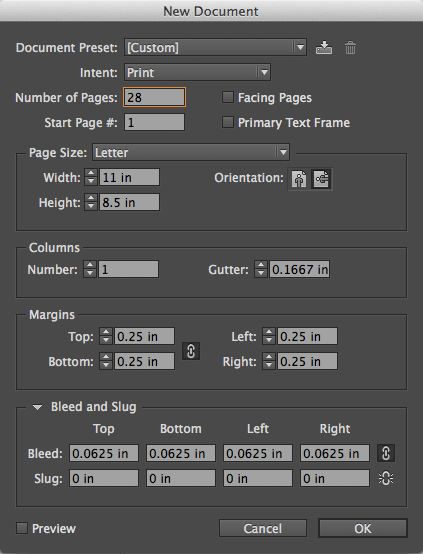
1. Create a new document with the following specifications

New Document settings

Number of pages: 28

Width: 11"

Height: 8.5"

Margins: .25"

Bleed: .0625"


Explanation of setting:
- All booklets (calendar or otherwise) must be set up as single pages (not printer spreads) hence the 28 page document.

- Margins are used to mark the safe zone area. All non-bleed items (such as text) must be .25" from the trim line.

- If you have background colors or images that need to run right to the trim you must extend those elements 1/16” past the trim on each side to account for the bleed area. 


2. Start designing!


Page 1 and 28 will become the front and back cover
of your calendar. 


The inside pages should follow this pattern:

page 2 design/photo for above January
page 3 January’s calendar
page 4 design/photo for above February
page 5 February’s calendar
... and so on until you get to page 25.

page 26 & 27 are often used for January of the following year or for an view of the entire year (totally your preference though!)

page 28 - The back cover needs to be rotated 180 degrees. It must face the opposite direction from the other pages. The reason is so that the back cover is right side up when the calendar is closed. 

Tips and tools:
- Pre-made  PDF calendars you can just place
into your design: here


– InDesign Calendar Wizard Script: here

- BE MINDFUL of the drill hole location when designing your calendar. The hole falls approximately .37" from the trim. We recommend downloading a template for reference. 


3. Save your document and then export as a PDF (in single page order). 
Your final PDF file should have 28 pages. 

Prefer to have a template? Download our calendar templates here

Monday, August 25, 2014

The Difference Between Cast and Calendered Vinyl


When working with adhesive vinyl there are two types of vinyl film you can choose: Cast and Calendered.

Cast Films

Cast Films are a premium-grade vinyl that starts life as a liquid, which is then spread out to an extremely thin layer.  Cast films will not noticeably shrink and will conform to irregular textures and curved surfaces, making them the best option for the most extreme outdoor applications – especially vehicle wraps.  Cast Vinyl provides vibrant, paint-quality color and the highest level of durability, lasting for years.

Calendered Vinyl

Calendered Vinyl begins as a lump of plastic that is then flattened by being passed through two pressure rollers.  Though not as high-quality as cast films, calendered film is adequate for less demanding conditions.  Calendered films come in two types: Polymeric and Monomeric.

Polymeric 

Polymeric calendered films have added polymers to reduce shrinkage, so they will fare much better in exterior applications than monomeric films but are not suitable for application over irregular surfaces.  For less demanding exterior work such as transit graphics that are frequently changed, polymeric films offer a workable alternative to cast.

Monomeric

The least expensive vinyl film is monomeric calendered.  Over time these films will shrink, collect dirt, and eventually curl up and flake off.  Monomeric films are best suited to short-term exterior applications or interior work.

These vinyl films can last anywhere from 6 months to 5 years or more, so it’s important to give us all the parameters of your install.  Talk to a GH Sales consultant or submit a QuickQuote so we can recommend the right vinyl for you.

Friday, August 8, 2014

4 Preflight Steps to Take Before Sending Large Format Print Files to GH Imaging


Before sending a file to GH Companies to be printed, there are some steps you should take to ensure that your file can be used for printing. These simple steps help ensure your art will be printed the way you intended it to and will also help expedite the printing process of your job.

Convert all Fonts & Text to Outlines

This is very important because if you don’t, it can cause your fonts to crash when the file is opened and be replaced with a computer’s default font.  Creating outlines guarantees your art and text will look exactly as you intended them to look. This can be achieved in Adobe Illustrator by selecting Type > Convert to Outlines (CMD + SHIFT + O mac or CTRL + SHIFT + O pc) while all the live text is selected. This changes the text into vector shapes instead of type. It will no longer be editable.


Art is CMYK

Ensure that the color of every part of your art is in CMYK color mode.  If colors are in RGB they will have to be converted which can result in an undesired change in color. This can be determined in Adobe Illustrator by selecting File > Document Color Mode and ensuring CMYK Color is checked.


Convert Strokes to Outlines

If using strokes in your design, convert your strokes to outlines.  That way, if your image needs to be resized it will still look the way you intended. This can be done in Adobe Illustrator by selecting Object > Path > Outline Stroke.


Embed All Images  

This saves the images into your file, ensuring that the computer can find it.  If not, the computer will replace the image with a blank box. This can be achieved in Adobe Illustrator by selecting the "Embed" button at the top bar of the file while the image is selected.


These simple steps will ensure that we can use your file and print your design exactly as you envision it.

Friday, July 18, 2014

The Difference Between Raster and Vector File


Every file saved on a computer has an extension after it.  A dot followed by letters that designate the file type.  It’s important to know the difference between some of the common file types.  With images and graphics, the most important distinction to know is the difference between Raster and Vector images. 

Raster Files or Bitmaps


Raster (or Bitmap) images are made up of pixels, dots of color that together form the image, similar to a mosaic. Photographs are always raster images, and most images you find online are likely to be raster too. Raster images will gradually lose quality as you scale them up, creating a low quality, pixelated appearance. 

The most common form of raster images is .jpg (or JPEG).  Most digital cameras will store images as jpegs by default, and most images found on the web are jpegs as well due to its small file size. 

PNGs and GIFs are similar to JPGs, but they also support transparency of an image.

Photoshop files, or PSDs, include the original layers of a Photoshop file to be edited, but can only be opened and edited with the Adobe Photoshop program.

Vector Files


Vector images do not use pixels.  Instead, they use math equations to determine how the image is formed.  Because of this, the image can be scaled up or down to any size without ever losing quality or becoming pixelated. 

EPS and PDF files are often used when saving vector images.  This is a great file type to use for large scale printing.

Two other ways to save a vector image are from the native file they’re created in .ai (an Adobe Illustrator file) and .cdr (a CorelDraw file).  These can be opened using Illustrator or CorelDraw as vector images and individual layers can be edited.

Keep in mind that these vector files can be opened with any image-viewing program, but will only remain vector images when opened with a vector-based program like Illustrator or CorelDraw.  Opening a vector image and saving it in a raster program (like the Mac’s Preview, Windows Image Viewer, or Photoshop) will rasterize the image.


When sending files to GH Imaging for printing, it is best to send files in a vector format to allow us to scale them to fit your printing surface without losing image quality.  Talk to your GH Sales Consultant for more information on file types and when to use them.

Wednesday, July 9, 2014

The Difference Between First Surface and Second Surface Decal Installations


GH Imaging offers clear vinyl decals in static or pressure sensitive forms. They are printed full color and are very easy to install. Graphics are always printed on the non-adhesive or static side

They can be applied two ways: First Surface or Second Surface.

First Surface

First Surface refers to applying a decal directly to the glass surface. The art is on the front side of the print. When standing outside, you view the print directly.

You can also choose to use a spot white underbase on your first-surface decal. This is a layer of white ink printed behind the art to make your design more vibrant while keeping the background transparent. A decal without the underbase isn’t as bright and can be slightly washed out from sunlight.

Second Surface

Second surface refers to applying decals to the interior side of glass. These will be viewed from the outside by looking through the glass. Second surface decals are always reverse-printed. Reverse printing is simply a mirrored image of the art so it can be viewed correctly from the outside once installed.

Second Surface decals can be printed with a spot white underbase or with a white flood coat. A flood coat is a layer of white printed over the back of the image. This is used when you want the whole decal needs to be white instead of the default clear.

To recap this are the 5 ways to produce and install clear window signs:

First Surface Install – No White Underbase
First Surface Install – With White Underbase 

Second Surface Install – No White Underbase
Second Surface Install – White Underbase
Second Surface Install – White Flood Coat 


Monday, June 30, 2014

Different Banner Finishing Options


At GH Imaging we have several ways to professionally finish your banners.  We will work with you to determine the appropriate finishing based on the time frame and application for your banner.  We’ll go over them in detail now.

Miller

Miller is the standard hem for all weld-able materials.  Using heat, speed, and pressure, Miller finishing produces a welded seam that fuses two materials together.  This will finish the ends of banners with hems or pockets for rope or poles.  This process is very durable, and perfect for use with banners that need to last a long time or will be used outdoors.

RF Weld

The RF Welder is a unique finishing process that fuses two materials together using a high-intensity radio frequency.  The result is an exceptional and durable edge to your banner.

Sewing

Sewing is used in variety of ways on multiple materials.  It is used to add hems and pole pockets for banners.  It is also used to seam vinyl or mesh to make a larger banner. Sewing is best used for fabrics, attaching Velcro, and when finishing non-weldable materials. 

Tuesday, June 10, 2014

Dye Sublimated Fabric Printing

Dye-Sublimated Printing (Dye-Sub) is a process that first prints ink onto fabric then the ink is cured/sublimated to the fabric. This creates a bond and the ink is now dyed into the fabric. It produces vibrant, full color prints. There is also dye-sublimation that transfers ink onto fabric and other materials using heat, but today we're just going over dye-sub printing for large format graphics.

This is a popular method use for trade show graphics, retail graphics and framing systems. Some products produced using dye-sublimated printing include flags, table covers, backdrops, banners and more.

Sail Flags

One of our most popular dye-sublimated products is the sail flag. These things are every where and that's because they're easy to assemble and dissemble, they can withstand windy environments and they grab viewer's attention. They're used at restaurants, car dealerships, retail shops and more. They're great to advertise sales, specials, new locations or just to draw attention to your business to bring in more customers.

GH Sail Flags are reverse printed, so the back side shows a reversed image of the front. The human eye naturally corrects this and views the message the same way as the  front side. This keeps the flag the perfect weight and prevents it from weighing down the hardware. So it will be able to easily swivel 360° degrees around the sail base.

Installing sail flags is a very easy task. The only tool you need is a hammer if you're using a ground spike base. A hammer helps you insert the base quickly into the ground. The rest is just putting the poles together and sliding them through the flag's pole pocket. Watch the video for complete installation steps.

Here's a Video on How to Install a Sail Flag so you can see just how easy it really is:


Wednesday, May 7, 2014

Event-Trac Asphalt & Concrete Street Graphics

What are they?

Event-Trac asphalt and concrete decals are exactly what they sound like, they're removable decals that stick directly to clean, dry concrete and asphalt. They are a great tool to get customer's attention and turn the ground into prime advertising space! Event-Trac's unique texture makes it slip-resistant, eliminating the need for an expensive over laminate. They are designed for short term use but they last anywhere from 2 weeks to 3 months or more depending on how much traffic and weather they're exposed to. To learn more about Event-Trac, click here!

Uses

Event-Trac is a great addition for a variety of events. It's a great way to promote, brand and provide sponsorship listings. Here are a few examples:
  • Parades – Promoting the branding of the parade, listing sponsors, parade attendees and more
  • Events & Festivals – Directional signage and labeling, sponsors, branding and more
  • Races – Finish lines, starting lines, check points, sponsors, branding and more
  • Parking Lots – POP promotions at retail centers, creative parking spots, branding, QR Codes and more
  • Sidewalks – Sales and promotions, directional signage, foot prints leading to sales, creative scavenger hunts, QR codes and more
  • Golf Outings – Sponsorship, competitions at holes, cart paths and more
  • Stairs / Escalators
  • Guerilla / Creative Marketing
Watch a video to see Event-Trac in action!


Get Adobe Flash player

Monday, April 7, 2014

Digital Printing vs Offset Printing

When someone says they need to get something printed, it sounds simple. There are two different types of printing methods typically used to put ink on paper. They are offset printing and digital printing, both have their advantages and disadvantages depending on the scope of the job or project. We'll go into detail about when you should use offset printing and when you should use digital printing based on the scope of your project.

Offset Printing

Offset printing is a process that involves transferring an image from a plate, to a rubber blanket, then to the paper. Offset printing is used for magazines, newspapers, brochures, stationary, booklets, etc. It is the ideal print solution when you need a large volume and high quality print. Offset presses have four print heads that each contain a different color of ink. On a four-color press, one print head contains Cyan ink, another contains Magenta ink, another contains yellow ink and the another contains black ink. Hence, CMYK color profile for print. Once print files are received, they are "ripped", which produces four-color negative plates, one plate for each color. In reality we are digitally separating your file into these plates to setup for the offset printing process. Once we affix your plates to the print heads each with it's own color, we then align the plates and begin printing your job.

Digital Printing

Digital printing uses a digital based image to print it directly onto paper. Digitally printing doesn't require changing plates, this allows a faster turn-around time and a lower cost, but there can be a slight loss of fine image detail. Digital printing is the ideal solution for lower quantity runs because you don't have to pay for plate set-up fees. Digital printing is also used for variable data, which allows you to personalize each print to the person who will receive them.

Offset Printing
  • Low Cost Large Runs
  • Spot Color Matching
  • High Image Quality
  • Works on many different materials
  • More expensive and time consuming

Digital Printing
  • Low Cost Short Runs
  • Variable Data
  • Less Steps
  • Allows for customization
If you have questions whether your job requires offset printing or digital printing, give us a call (800.456.8238) or submit a QuickQuote on our website  – we'll be happy to help!

Wednesday, March 5, 2014

Steps to the Screen Printing Process

Step 1: Prep the Art

The art is first brought to the designer, whether you have your own design or we are creating one for you. The designer will then place the art onto a template with a mock up of your design on your garment. They will identify imprint colors, locations (how many and where) and the overall imprint size of your screen printed design. You will be sent this proof, once approved the designer will separate the artwork based on how many different colors are used in the design. If there is only one color, there will only be 1 separation, but if there are 4 colors, there will be 4 different separations. The separations are then printed onto separate pieces of clear film, these are used to create the screens.

Step 2: Dark Room

After the films have been printed, they are taken into the production process. Our screen printer carefully looks over the prints to ensure everything looks right. Next, the screen printer carefully measures, aligns and tapes the print onto the screen to match the approved print. Once the prints are placed onto the screen, the dark room process begins. Using a UV light unit, the prints are burned on to emulsion-covered screens. The UV light burns each design color onto a screen.
Aligning prints onto the screen to match proof


Burning the Screen using UV light machine

Step 3: Finalizing the Screen

Next is the final step to creating the screen for production. The screens are rinsed using a pressure hose to push out the excess emulsion, the design is revealed in white on the screen. Ink will be pushed through white areas of the screen to create the design.
Rinsing screen with a pressure hose.

Step 4: Imprinting the Garment

Taping off the Screen
After the screens have been prepped and burned, you will need to tape the edges of the screen. This helps protect the garment from excess ink. Now, it is time for the actual printing process to begin. Depending on the job, our screen printer will either print by hand or use an automatic press. First, An ink color is poured onto the top of the screen. Then the garment is placed onto a flat platform straight and evenly. The screen is then lowered onto the garment and a squeegee is pulled across the screen, which applies the ink. 

When using multiple colors, 
Applying ink to the garment
the garment will go under a ‘flash’ unit to cure the ink in-between color applications. After all the colors for the design are applied, the garment is placed on a moving conveyer belt, which brings it under a dryer to completely dry and cure the ink. This process repeats for every garment.
Drying Garment

Watch a Video of the Screen Printing Process now!


And that’s how screen printed garments are produced. Contact us today for more information or start a custom screen printed apparel order!


Learn More: 800.678.4041  |  ghapparel.com

Monday, February 10, 2014

Offset Printing: File Prep Basics

As many of you already know so much more goes into the printing process than a simple
FILE > PRINT. When setting up files for offset printing there are many things that need to be taken into consideration.  Two of the most important things include bleed area and safe zone. 

The purpose of the bleed area
After printing, every job goes through some sort of finishing process; trimming, binding, folding etc. With each step in the finishing process there is a certain margin of error.

Imagine taking this sheet (left) with 4 flyers on it and trying to cut perfectly along the edge of the flyer without any white showing when you are done. Oh, and don't let any of that green from the top of the flyer show on the bottom of the other flyers.  Even the smallest fraction of movement could result in a sliver of white showing along the outside edges of the finished product, or cause some of that green to show up along the bottom of the flyers.


Adding bleeds allows us to reduce the margin of error during the finishing process.


Setting up bleeds
Some printers have different standards for bleed, but at GH we require 1/16" (.0625") bleed area on each edge, for example an 8.5 x 11" flyer would actually have a document size of 8.625 x 11.125" to account for the 1/16” bleed on each edge.

Many design programs (like InDesign or Illustrator) have a specific section for indicating the amount of bleed area you need.

For example, the snapshot to the left is of InDesign's New Document Window. At the bottom there is a specific field to enter the amount of bleed on each edge of the document. 


 *Something to watch out for: When you are exporting to a PDF from your design program make sure your PDF settings include document bleeds.


Other programs (like photoshop or publisher) you actually have to set your document size to include the bleeds. 

Remember, simply stretching your background color or image past the document size does not automatically add bleeds to your document. You must either specify the bleed area in the settings or build them into the overall document size. 


Safe zone area
As mentioned before, there is always some margin of error that comes with each step in the printing process. Safe Zones are another tool used in the print industry to help reduce that margin of error. 
 
At GH we recommend that all non-bleed elements, such as text or photographs be at least .125” from the trim. Keeping text and non-bleed graphics within this area will ensure that these elements are not trimmed off.  

Side note: On booklets the safe zone is increased to .25"


Templates
Want to be sure that your artwork will fit our guidelines? Contact your sales rep, they have templates for many of our standard sizes and if your project doesn't fit one of the standard templates we would be happy to create a template for you!

If you have any file set-up questions please feel free to comment below or check our full list of artworkguidelinesOtherwise stay tuned for more tips directly from your favorite GH design team!