Designing a standard 12 month (saddle stitched) calendar in InDesign:
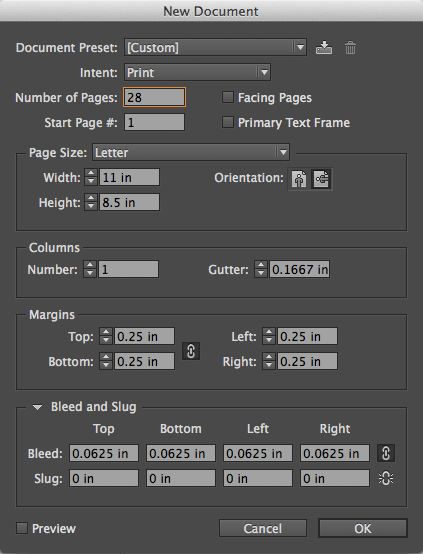
1. Create a new document with the following specifications

Number of pages: 28
Width: 11"
Height: 8.5"
Margins: .25"
Bleed: .0625"
Explanation of setting:
- All booklets (calendar or otherwise) must be set up as single pages (not printer spreads) hence the 28 page document.
- Margins are used to mark the safe zone area. All non-bleed items (such as text) must be .25" from the trim line.
- Margins are used to mark the safe zone area. All non-bleed items (such as text) must be .25" from the trim line.
- If you have background colors or images that need to run right to the trim you must extend those elements 1/16” past the trim on each side to account for the bleed area.
2. Start designing!
Page 1 and 28 will become the front and back cover
of your calendar.
The inside pages should follow this pattern:
page 2 design/photo for above January
page 3 January’s calendar
page 4 design/photo for above February
page 5 February’s calendar
... and so on until you get to page 25.
page 26 & 27 are often used for January of the following year or for an view of the entire year (totally your preference though!)
page 28 - The back cover needs to be rotated 180 degrees. It must face the opposite direction from the other pages. The reason is so that the back cover is right side up when the calendar is closed.
Tips and tools:
- Pre-made PDF calendars you can just place
into your design: here
– InDesign Calendar Wizard Script: here
- Pre-made PDF calendars you can just place
into your design: here
– InDesign Calendar Wizard Script: here
- BE MINDFUL of the drill hole location when designing your calendar. The hole falls approximately .37" from the trim. We recommend downloading a template for reference.
3. Save your document and then export as a PDF (in single page order).
Your final PDF file should have 28 pages.
Your final PDF file should have 28 pages.


No comments:
Post a Comment